|
|
Color Spaces in Sagelight
Manual use of Color Spaces in Sagelight and seamless Color Space Transformations
|
Sagelight supports many different color spaces, both in manual modes such as through the Pro Quick Edit Mode, Power Curves, Saturation and Vibrance, image blending, and other tools.
Sagelight also uses multiple color spaces behind the scenes to make editing easier and more productive.
Manual & User-Selected Color Spaces
Sagelight supports the following color spaces in the Power Curves and other modes:
-
RGB
-
XYZ
-
C*I*E LAB
-
Hunter LAB
-
HSL
-
HSB/HSV
-
YCrCb
-
C*I*E LCH
-
C*I*E YXY
-
C*I*E RGB
-
C*I*E Hunter Lab
-
C*I*E YCrCb
All color spaces provided in Sagelight have a very useful purpose specific to them color space. For example, C*I*E LAB, XYZ, Hunter LAB -- i.e. all non-RGB spaces -- allow you to split the color from the light to work with them separately. This can be very useful in image processing. For example, you can use the C*I*E LAB mode to perform an Unsharp Mask on just the L channel, which is technique that allows you to sharpen your image without creating color edges. Similarly, if just the colors are blurred on the C*I*E LAB A/B channels, this is a great way to reduce color noise without making the image look blurry.
With HSL mode, as another example, you can use the Hue channel -- and, a broader sense, all channels individually -- to create very nice toning effects, either subtle or drastic (see examples below).
YXY LCH mode is supported because working with the Y channel with the curves can create steep effects and it also works with highlights on a wider range which can be helpful in changing highlights that are very close to the edge.
Other modes have their purposes, too. Hunter LAB, for example, is used in some editors for Saturation, and XYZ mode can be great to work with to balance and tone your image.
The different color spaces are explained in various places in Sagelight. Look for more descriptions where they are used.
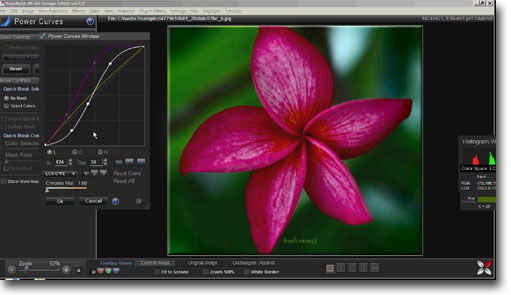
With the C*I*E LCH color space, the Hue, Saturation and Luminance can be changed independently, which can help create a clean, saturated image.
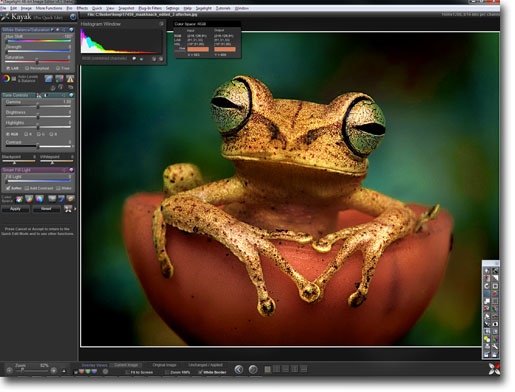
With a very difficult picture such as this where the deep reds tend to overflow and cause problems, using the C*I*E LCH color space is a great way to change an image in ways that wouldn't be possible in RGB, XYZ, etc. The result with this picture is a very sharp, colorful picture that could not be obtained so easily in other colors spaces.
HSL is another color space that can be very useful in ways much more pronounced than other color spaces. HSL can change and enhance colors with fidelity that C*I*E LAB, XYZ, RGB and other color spaces can't match:
With such a pronounced curve (shown in the curve box on the screen), the quality remains very high and the color change from one hue to another is very deep and true to the depth of the original tone. C*I*E LAB, RGB, XYY, and other modes would fade the colors very easily.
While the previous example was designed to show the purity of HSL color space, here is a more practical example that shows HSL being used to help tone an image and create contrast:
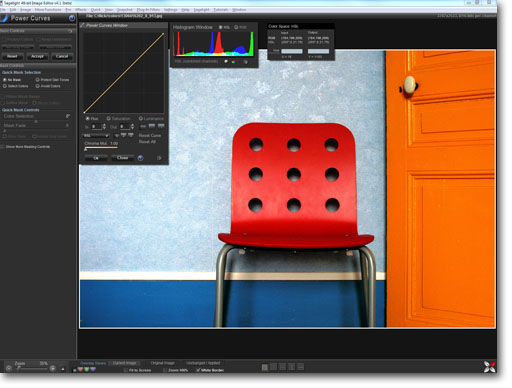
Original Image
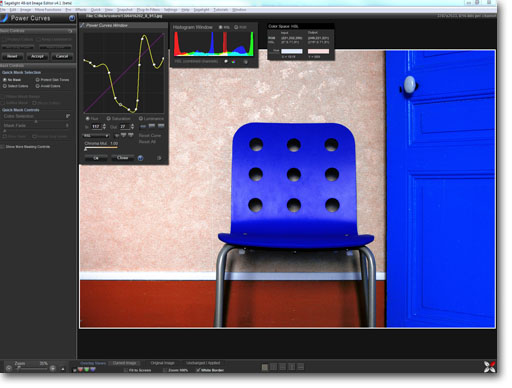
With this image, HSL was used in the same manner to tone the image and bring out the contrast. HSL is always a good place to go when you're looking to create contrast and add color. In this image, the image was toned by making subtle changes to the HSL curves independently, with the saturation increased in the lower saturated areas.
The result image looks as if it has the same colors as the original, but it doesn't. The hues were deepened with the HSL curves. If the hues had not been changed, the result -- due to the deepening of the light and contrast -- would have a very yellow appearance. Other functions were then performed, such as adding a vignette, local contrast functions, and Sagelight Vibrance.
Color Spaces Behing the Scenes
In addition to the ability to use color spaces directly, Sagelight uses multiple color spaces automatically to keep the quality and ease-of-use very high. For example, when you're toning an image Sagelight can move from RGB->XYZ->C*I*E LAB->XYZ->RGB, RGB->XYZ->YXY->XYZ->RGB, or RGB->HSL->XYZ->C*I*E LAB->XYZ->HSL-RGB, for each and every pixel while maintaining a realtime display.
Saglight uses the best known color space for each different operation. Rather than relying on C*I*E LAB or other C*I*E spaces (which are not always the best color spaces to use when splitting light & color for every operation that can benefit from the approach), Sagelight uses many different color spaces, seamlessly converting from RGB to the desired color space, performing the opration, and then converting back to RGB; all in realtime.
Typically, image editors work primarily in RGB space. This is the easiest space to work in and it is also the most intuitive. LAB and HSL spaces work with the color separated from the light, and this can be difficult to visualize.
When you are in non-RGB spaces, the image is necessarily viewed in RGB space, since the monitor on your computer works in RGB space. Therefore, the view you have in a non-RGB space (i.e. LAB, HSL, YCrCb, etc.), gets converted back to RGB space even if you don't convert it back later.
Eventually most images, when in another color space, will need to be converted back to RGB in its final form.
Different color spaces can offer elements outside of the RGB space that can be good for your image. For example, sometimes a C*I*E LAB-based saturation increase can be more technically correct and much cleaner than an HSL- or YCrCb-based saturation increase.
Also, using LAB or HSL space can allow you to work with just the luminance alone, outside of the color -- in RGB space, the color and luminance are changed together.This sort of power gives Sagelight the ability to transform your image without having to manually move into different color spaces to edit one part of your image. This gives you much more control over your image and flexibility to try different things. Where you would have to multi-step many things, Sagelight's ability to convert to and from color spaces on the fly allow you to get a much more visceral approach to your image where you would otherwise have to visualize the process ahead of time.
C*I*E LAB and HSL Color Space Modes in the Pro Quick Edit Mode
Beyond the modes that support different color spaces directly and indirectly, the Pro Quick Edit allows you to use C*I*E LAB and HSL color spaces by selecting them explicitly.
Comparing Color Space Modes: Switching Back-and-Forth Easily while Keeping Settings
A great feature of the Pro-Quick Edit Mode is that you can switch between RGB, HSL, and C*I*E LAB color spaces very easily while keeping the settings in place to see the differences. With the traditional approach, you must move into the C*I*E LAB color space as a separate mode.
C*I*E LAB and HSL modes can often be guesswork -- even for professionals. Adding saturation in the C*I*E LAB mode can be very different than an RGB- or HSL-based saturation, and it varies from picture to picture. Therefore, it's sometimes necessary to try different modes to get a different look. This is true for other items, as well, such as toning curves that look very different in different color spaces.
The Pro Quick Edit Mode allows you to switch between different modes while keeping the settings for the tone curves, Power Box (local contrast, sharpening, LightBlender, etc.) to see what each set of controls looks like between the color spaces. Also, the mode switches remember the different Saturation and color tone settings for each mode. You can set a different saturation level in each different mode to get tonal quality to an image that suits the space and then compare it to the equivalent settings in the different color spaces.
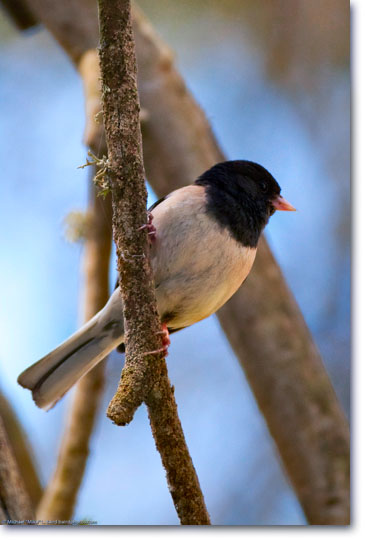
Here is an example of using the C*I*E LAB mode to add color. The color saturation approach in C*I*E LAB mode is different than all other modes, and is sometimes very pure.
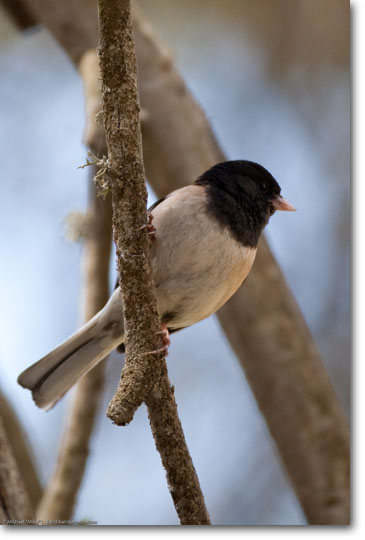
Original Image (Image Credit: "Dark Eyed Junko" by mikebaird)
This image was created by using successive Saturation passes in the C*I*E LAB mode, with a tone curve in RGB mode to warm the picture. This is the flexibility of the Pro Quick Edit Mode, where you can perform functions in one color space and then augment the image in another color space, all while in the same menu.
Mathematical Approach and Image Quality
As mentioned, Sagelight's core image-processing image performs float-point calculations at 32-bits per-channels. With color space tranformations, this keep the quality very high even though the image is going through a lot of conversions back-and-forth between color spaces.
Sagelight RGBC (and other Chroma channel spaces)
An example of the complexity of Sagelight's engine that also makes it more useful is the RGBC, C*I*E LABC, XYZC spaces used in the Power Curves. This adds a lot of power to the curves, as you can also control the Chroma element of any given color space.
With Sagelight's RGBC space, this required the development of Sagelight Saturation in the RGB space that is designed to deliver authentic and deep color, without the color shifting typical of other modes such as C*I*E LAB, XYZ, and Hunter LAB, or the noise problems of HSL saturation.
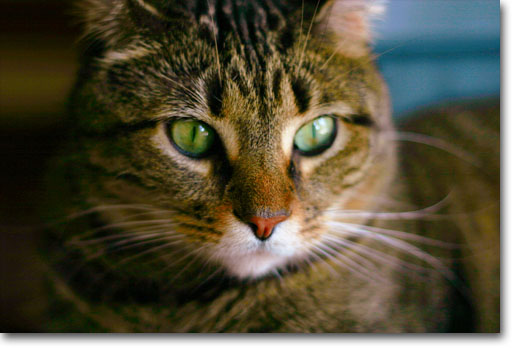
Original Image (Image Credit: "Merlin Dark" by Mel B.)
This image was created with one set of curves. It shows how the 'C' channel adds a benefit to the curves. By changing the R,G,B chanels to lift the light and tone the image to a better color, the Chroma channel was used to increase the saturation selectively.
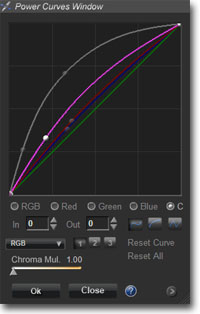
This is the curve set that was used in the RGB space. The purple curve is the (C) channel. You can also see the Red, Green, Blue, and RGB curves in the background.
Sagelight's RGBC saturation converts between C*I*E LAB and RGB space multiple times per-pixel to keep the quality high. With the speed and SSE-based nature of Sagelight's core engine, these color space transformations are simultaneously kept at the highest quality and deliver realtime feedback.