|
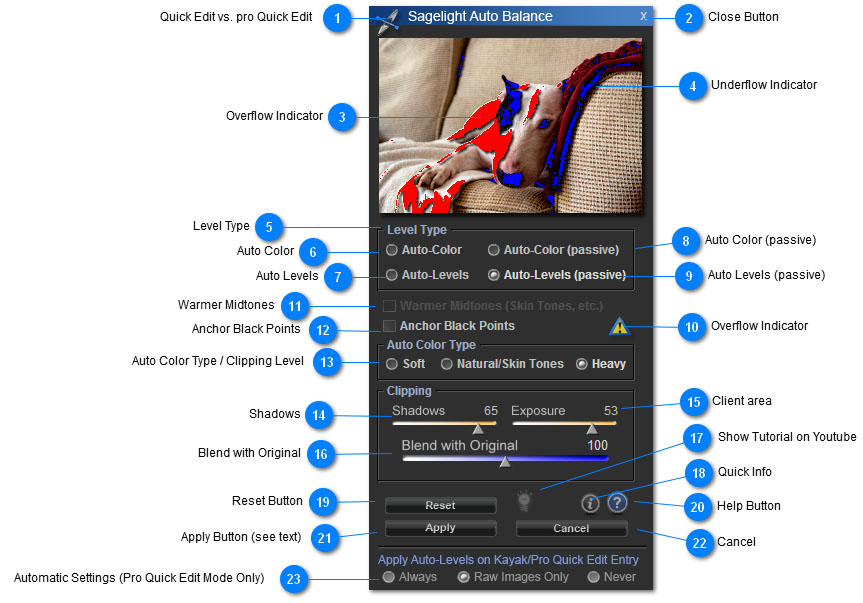
Auto Balance Quick Reference
Hover the mouse over the circular tabs for a description of each function
 Quick Edit vs. pro Quick Edit
The Pro Quick Edit and Quick Edit modes have similar Auto Balance functions. They both perform the exact same set of functions, but the Pro Quick Edit Mode shows the overflow and underflow thumbnail. The Quick Edit mode will eventually have this as, well.
For the moment, the Pro Quick Edit Mode version is a better option, though the Quick Edit Mode version uses the same algorithms.
|
 Close Button
Use this button to close the window. This is the same as pressing the "Cancel" Button.
|
 Overflow Indicator
Pro Quick Edit Mode Only: As you select buttons or move the Exposure Slider, the red areas show you where overflows have occurred. This means that there are at least two channels with data that has exceeded the upper limit and will not be recoverable if the image is applied with these settings.
In many cases, this is fine and you want to do this to get the right look for your image. However, it is good to be aware of overflows -- the red areas can tell you where to look for reflections and other areas that are becoming unintentionally washed out.
|
 Underflow Indicator
Pro Quick Edit Mode Only: Just as with the overflow indicator, the underflow indicator is showing you where values are starting to become lost. In many cases, this is what you want for your image, i.e. tp bring down the shadows to black.
In other cases, it can be unintentionally and these areas can be hard to see. Use the Shadow Display button in the Pro Quick Edit Mode to see these areas.
Watching these areas can prevent the unintentional lose of shadows. The blue areas indicate two or more channels with data that has gone below 0 and will not be recoverable if these settings are applied to the image.
|
 Level Type
The controls in this area select the type of Auto Color and/or Auto Levels type that will be applied to your image.
In General, it is best to try all four to see which makes your image look the best, as they are designed to try the most common algorithms that will help your image.
See the next four sections for descriptions of each Auto Color/Level type.
|
 Auto Color
Much of the time, this is the best option. It works by performing an Auto-Levels and Auto-Color on your image. However, it can also go too far.
Try the other sections, and also try merging this result with the original image by using the "Blend with Original Slider".
The 2nd best option to try is "Auto Levels (Passive)" which is the default setting.
|
 Auto Levels
This option simply performs an auto-levels, adjusting the RGB channels individually for white and black points. This can often be the best balancing option for your image. It can also be harsh. Watch for the Warning "Yield" Sign when using this option.
In many cases, Sagelight will draw back on the amount of levels applied, which can leave your image looking a little dark. Use the Exposure slider to compensate.
|
 Auto Color (passive)
This algorithm is much like the Auto Color algorithm, except that it does not perform a complete auto-levels. It brings the RGB points down to 0 (passively), and adjusts the white points to the nearest full value. For example, if red is .8, blue is .65, and green is .5, the passive levels sets the red to 1.0, with blue and green moving the same distance.
In a non-passive mode, all top values are set to white for each channel which can cause color issues, or can balance your image.
|
 Auto Levels (passive)
This performs an auto-levels on your image by bringing down each RGB channel to 0 individually. It then does a passive levels on the highlights. See the section above on "Auto Color (passive)" for more information.
|
 Overflow Indicator
When this shows, Sagelight has protected your image from overflow damage.
Many editors perform auto-levels which can sometimes make your image look great, but can also damage the image in ways not completely apparent.
In some cases, the image may appear darker than you wish in Sagelight because Sagelight has detected that damage to your image is about to occur. Sagelight does as much as it can, but stops short of hurting your image.
When this image appears, press it to have Sagelight show you where these areas are in your picture.
To Compensate when Sagelight Draws Back
Simply use the Exposure Slider to compensate when Sagelight tells you it did not want to damage your image. Sometimes you may want to overflow points in your image, but Sagelight will leave that up to you.
|
 Warmer Midtones
When this value is active (i.e. not grayed out), Sagelight adjusts the midtones when the auto color is used. This can add a more natural look to your image.
If you're not seeing what you would like in your image after trying the 4 Auto Color/Levels types, try this button, too.
|
 Anchor Black Points
When Sagelight does a levels to in the shadow areas, the black points are set to the closest black level. If the lowest red, for example, is .2, and blue is .4, and green is .6, the levels, by default, will set red to 0, blue to .2, and green to .6.
When this value is checked, all values are set to 0 based on the lowest value. In the above example, each value will be set to 0, with the result of the data in each channel multiplied to bring the shadows to 0.
This can help balance your image and remove low-level color casts. It is not the default, however, as it can be natural for pictures to not have (0,0,0) as the lowest point in the image (such as a daylight picture with few shadows, for example)
|
 Auto Color Type / Clipping Level
This sets the clipping level of your image. By default, the clipping level is .1 percent, which means that 1% of the top and bottom data will be cut from your image in order to perform the aut-levels.
Typically this is fine, but the more clipping that occurs (to a certain point), the your image may be more likely to be balanced. If you see some balancing occuring, try these buttons to change the amount of clipping. Sagelight clips the data, but then restores the highlight points, so no data is lost.
|
 Shadows
This slider brings down the black points in the image. In the Pro Quick Edit Mode, watch for the blue areas in the thumbnail. In the Quick Edit Mode, watch the histogram for shadows falling off the edge.
|
 Client area
This slider brings up the white points of your image. Use this slider to compensate when Sagelight has drawn back on the auto-levels to protect your image. You can also use this slider as a general exposure tool. This is the same as the Exposure Slider in the Power Box.
In the Pro Quick Edit Mode, watch for the red areas indicating whitepoint overflows. In the Quick Edit Mode, watch the histogram for highlights falling off the right-edge.
|
 Blend with Original
This slider will blend the auto-balanced result with the image before auto-balancing. This can be used in two ways:
-
To draw back on the auto balance. Sometimes the auto balance goes too far, as it is trying to get the right neutral tone. Move this slider to the left to blend with the original image.
-
To add more balancing. You can magnify the balancing effect by moving the slider to the right.
note: In the Pro Quick Edit mode, this slider mixes the blending result with the "Auto-Levels (passive)" result. In the Quick Edit Mode, this mixes the image with the image as it existed prior to coming into the Auto Balance.
|
 Show Tutorial on Youtube
Show Video Tutorial on Youtube. Pressing this button will launch your browser to a Youtube video that is a tutorial on the Auto Balance function.
|
 Quick Info
This button will show a quick information chart on how to use the Auto Balance.
|
 Reset Button
Pressing this button will reset the Auto Balance controls to their initial settings.
|
 Help Button
Press this button for help on using the Auto Balance.
|
 Apply Button (see text)
The Apply Button acts differently depending on whether you are in the Quick Edit Mode or Pro Quick Edit Mode.
Quick Edit Mode. Pressing Apply will apply all of the changes to your image and then return you to the Quick Edit Mode.
Pro Quick Edit Mode. Pressing Apply only applies the settings to your image in memory, as a layer underneath all Pro Quick Edit Layers. The Auto Balance in the Pro Quick Edit mode is technically a subset of layers and part of the Pro Quick Edit Mode itself. As such, the changes are not applied until you press the Apply Button in the Pro Quick Edit Mode.
|
 Cancel
Pressing this button will cancel all changes and exit the Auto Balance function.
|
 Automatic Settings (Pro Quick Edit Mode Only)
Pro Quick Edit Mode Only. This tells the Pro Quick Edit Mode when to automatically perform the Auto Balance. By default, it is performed whenever a RAW file is loaded only, as RAW files typically benegit from an Auto Balance most of the time.
When the Auto Balance is performed automatically, it is performed as a "Auto Levels (passive)", which typically make the image look better or doesn't change it.
You can tell the Pro Quick Edit Mode to always perform this as an automatic process, only when a RAW image is loaded, or to never perform the balance as an automatic process.
note: this is performed only once per file. If you leave the Pro Quick Edit Mode and come back, the auto balance is not performed automatically again for the same image.
|
|
|