|
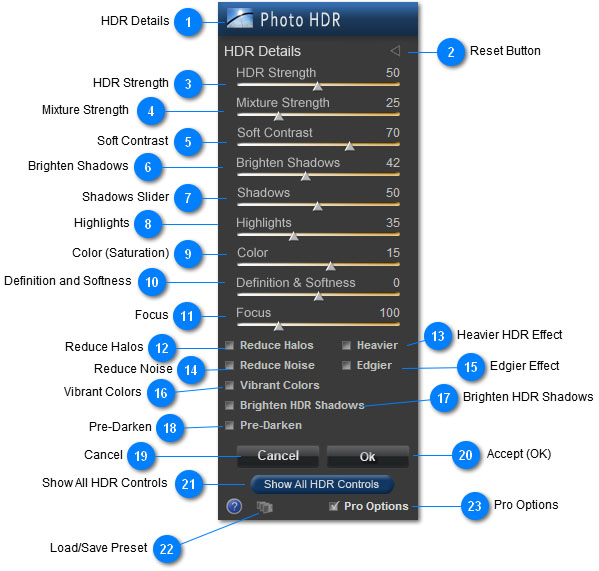
 HDR Details
 is designed to bring out details in your image. It can be used to enhance images while keeping photorealism as well as to to produce artificial & artistic HDR images similar to HDR-specific programs.
The Mixture Strength Slider helps control the realism vs. artistic nature of the result.
Also consider using the Undo Brush to perform partial results, which can help create great images that aren't overwhelming with an full HDR effect across the entire image.
|
 Reset Button
Press this button to reset all settings to their default state.
|
 HDR Strength
The HDR Strength slider sets the strength of the Range Compression function. It is initially set to 50%. Lower settings are more realistic and produce less definition, while greater values create more definition but also create more noise and more of an 'HDR' (i.e. artificial effect).
How the HDR Strength effects the image varies from image to image. In many cases, a lower value may seem like it has a slight effect, when it is actually creating a large difference in your image -- this can be because the higher values create such a difference in your image that lower values seem far less effective by comparison.
Try using the Unchanged Image button (in the bottom part of the screen) to toggle between Before & After images so you can see the difference.
Different settings may also affect the light in your image, making it darker or lighter. Use the other control sliders (i.e. Shadows, Highlights, etc.) to compensate, or to add specific lighting qualities.
|
 Mixture Strength
The Mixture Strength Slider blends the result with your image. Many results can be harsh, and the Mixture Strength will reduce the amount of the result, blending it back with your image by the percent indicated on the slider.
The Mixture Strength can be used to convert a harsh result into a photographic result that is much more defined, to simply ease a result to look a little less harsh, but still more artistic in nature.
|
 Soft Contrast
The Soft Contrast slider adjusts the contrast of the image using the Sagelight Smart Contrast algorithm. This adjusts the contrast by using a real-time, live analysis of the image, keeping highlights and shadows from becoming blown out or too deep.
|
 Brighten Shadows
The Brighten Shadows slider brightens the shadows in the image using a halo-free tonemapping curve. This can be useful in bringing out shadows. This can be used with the Shadows slider, which deepens the shadows in a similar manner -- together than can create nice contrast in your image. Also use with the Soft Contrast Slider to help manage the shadows.
|
 Shadows Slider
The Shadows Slider deepens the shadows in your image using a halo-free, tonemapping curve. This will bring down the shadows in your image while creating contrast.
Use this with the Brighten Shadows slider to create contrast, and with the other controls to control the light in the HDR result.
|
 Highlights
The Highlights Slider will reduce the highlights in the image using an analysis of the highlight areas.
The Highlights Slider works dramatically differently depending on the "Reduce Halos" setting. See this control for more information.
|
 Color (Saturation)
The Color Slider increases or decreases the amount of color (saturation) in the result. This uses the Sagelight RGB Hybrid algorithm, delivering a deep, warm saturation.
With HDR and CLAHE results, adding color can often make an image look nicer. With some results, reducing the saturation may work better.
note: when using the 'Vibrant Colors' function, the saturation will typically need to be adjusted as a result.
|
 Definition and Softness
The Definition & Softness Slider will add or remove definition from the image. When moved in the positive direction, definition as added. Watch for halos, as these can sometimes appear in areas with a lot of contrast. If halos do appear, you can use the Definition in the Quick Edit Mode (which is the same thing) and then use the Undo Brush to control halos that may appear.
In the negative direction (i.e. left), the image is softened.
Depending on the preset, the Definition Slider can be set in a high positive (i.e. sharper, more definition) or high negative (i.e. soft) value.
The setting of this slider can make a very big difference in how your image appears. This is a good control to try in both directions to see how it affects your image.
note: Use the Focus Slider for deeper definition -- sometimes the Definition slider can cause noise. You can back off on this slider and use the Focus Slider instead.
|
 Focus
The Focus Slider adds 'focus' to your image, which is like adding Definition but deeper and more defined. This can be used to create more contrast and edginess to your image without creating noise or sharpening effects.
The Focus Slider is a great companion to the Definition Slider, and between the two, you can add great contrast and definition to your image.
|
 Reduce Halos
The Reduce Halos button can reduce halos caused by higher Highlights Slider settings. When off, the Highlights Slider can be very harsh (which can be useful) and can cause halos with some images, especially with higher settings.
When the 'Reduce Halos' button is checked, the Highlights algorithm reduces the halos, but it also less effective and may not bring down the highlights on some upper highlights.
When turned on, the highlights will brighten (if there is a large-enough value set with the Highlights Slider), and you will need to move the Highlights Slider to a higher value to compensate.
|
 Heavier HDR Effect
The 'Heavier' button magnifies the HDR effect by performing the Range Compression function twice. The result is a more HDR-like image.
This button can be used in two ways:
1. Create a heavier HDR effect. On many images, setting the 'Heavier' switch will provide a deeper HDR effect.
2. Create a more realistic image. When the 'Heavier' option is turned on and magnifies the HDR effect, this means that you can use a lower value on the HDR Strength Setting. This will often allow for less HDR-like (i.e. artificial) effects to occur with the image while adding definition. Since a lower HDR Strength manipulates the image less, this can increase the quality of the HDR effect by doubling it with lower values.
note: when using the 'Heavier' option with the 'Brighten HDR Shadows' option, this may cause the image to brighten even more.
|
 Reduce Noise
When checked, the Reduce Noise option performs noise-reduction on your image prior to any HDR operation. HDR causes noise by its nature, and reducing the noise can help alleviate this issue.
When you first click this button, it may take a few seconds to generate the noise-reduction image. This only occurs once, and selecting it after that will not take any time.
|
 Edgier Effect
The "Edgier" option will cause a more defined HDR result. This can help an HDR image to look more realistic and to have more local contrast. However, this can also cause halos. Try toggling the switch to see the difference.
|
 Vibrant Colors
When checked, the colors are fill much more in the shadows and can lead to much more colorful images. This can also provide too much color. Some settings have this checked as a default, where others don't, depending on the particular effect.
When unchecked, the colors fill more in the middle and an image can look more natural.
In cases where colors seem to overwhelming (especially skin tones), turn this setting off.
note: when this setting is changed, the saturation will typically need to be adjusted with the Color Slider. For example, when this setting is turn ON (from an OFF) state, the colors may become much too saturated. In the opposite direction (being turned OFF from an ON state), the colors may become dull.
In both cases, use the Color Slider to compensate.
|
 Brighten HDR Shadows
The Brighten HDR Shadows option will cause the HDR result to become brighter in the shadows on most images (but not all).
This is useful when the HDR result causes the image to become darker or just generally to brighten the image.
In some cases, the image may become brighter than desired (especially when the 'Heavier' option is set). When this happens, use the Shadows and Soft Contrast Sliders to compensate. Also use the Color (Saturation) Slider to help with color differences.
|
 Pre-Darken
The Pre-Darken slider pre-darkens the image with a halo-free, tonemapping curve prior to the HDR operation. This can help keep highlights under control and to also deliver better definition and color to brighter items in the HDR result.
It can also cause noise in some images with drastic highlights, which can be relieved to some degree by making sure the "Reduce Halos" button is on.
If you still have problems with highlights, consider using the Exposure Slider (in the Power Box) to reduce the highlights before using the HDR function.
|
 Cancel
When pressed, this will cancel all changes and exit the HDR Function, returning you to the Quick Edit Mode (or Pro Quick Edit Mode) without changing your image.
|
 Accept (OK)
When pressed, the current settings will be performed to your entire image and you will be returned to the Quick Edit Mode (or Pro Quick Edit Mode).
|
 Show All HDR Controls
When pressed, the current menu will shrink into a small menu and the main HDR panel will appear. The main HDR panel has many more advanced controls where you can change even more of the result.
The HDR function is a subset of these controls. When pressed, a menu with a button called "Return to Presets Menu" will appear. Press this button to return to this HDR menu. All changes in the main HDR panel will stay active, and those settings that are controllable in this function will be changed accordingly.
|
 Load/Save Preset
When pressed, this button will allow you to load or save a preset for later use.
|
 Pro Options
When checked, this will show ALL options (as presented here). When off, only the more useful or less advanced options are shown.
|
|
|