|
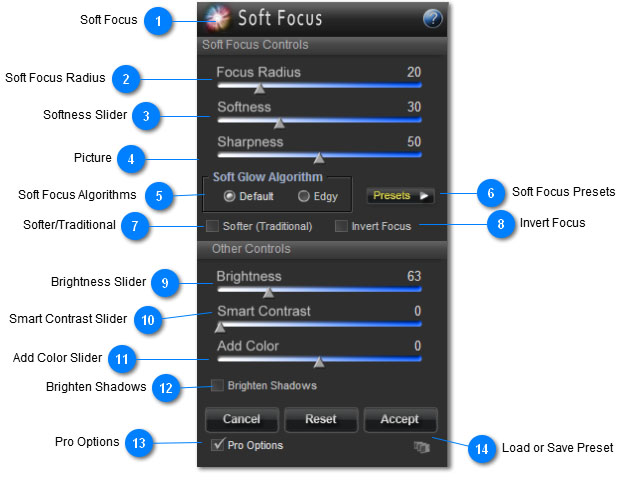
 Soft Focus
Sagelight Soft Focus. Click the ? button for the main help page.
The Soft Focus function has a number of different ways to add a soft focus to your image. It can add a defined soft glow, or one that helps add definition and sharpness to your image. See the main help section for more information, as well as the descriptions of each control in this section.
|
 Soft Focus Radius
The Soft Focus Radius Slider sets the radius of the basic soft focus blur. Unlike the softness, which controls how blurry or focused the image appears, the Soft Focus Slider controls how the blur looks.
With a wider radius, the image will appear to have sharper, more overall 'fuzzy' quality. With lower values, the image is less defined and can have more of a glow.
Use this slider with the Softness Slider
|
 Softness Slider
The Softness Slider is used to determine how much of the Soft Focus Blur to keep. This basically sets a transparency level between the original image and the soft focus blur.
With lower settings, the image will appear more defined. With higher settings, the image will have less focus and can become blurry, which sometimes is a nice effect, especially when combined with the Sharpness Slider.
The Softness Slider is also used with the Brightness Slider, which can provide a nice surreal glow to an image.
|
 Picture
Most images look better when the image is sharpened with the Soft Focus. The Sharpness slider allows you to increase are decrease the sharpness level.
Increasing the sharpness level when also increasing the Softness Slider level can be an interesting effect. Reducing the Sharpness Slider can make an image appear softer.
|
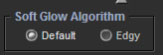
 Soft Focus Algorithms
The Soft Focus uses two different algorithms.
The default algorithm is used to bring out the softness of an image while keeping the general tonal qualities.
The 'Edgy' algorithm creates contrast and a nice highlight glow effect. WIth this algorithm, using the "Brighten Shadows" control can be useful, as this algorithm tends to make an image darker in the shadows -- you can use the Smart Contrast slider to compensate for areas that become too bright.
note: Each algorithm has its own settings. All controls in the Soft Focus function will change to their independent settings when you switch algorithms. Each algorithm basically acts as a separate function within the Soft Glow Function
|
 Soft Focus Presets
There are a number of presets available with the Soft Focus.
The Soft Focus can be used to create an image that is simultaneously sharper and soft, without the appearance of a Soft Focus effect.
The Soft Focus can also be used to create more defined glow-like effects.
There are a number of presets to set different modes. You can use these as great starting points, and then use the Soft Focus controls to change the result.
|
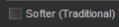
 Softer/Traditional
The works in the Default algorithm mode only.
The Softer/Traditional switch causes the default algorithm to be less sharp and creates less contrast. This also makes the image less 'fuzzy' or blurry, and can be used to create a sharper image that also has a soft focus quality to it.
This mode is also the original Sagelight Soft Focus mode.
If your image seems to have too much color or contrast, try this switch.
|
 Invert Focus
Available in the Default Algorithm Mode only.
The Invert Focus is a somewhat advanced control. It can be used to change how the soft focus defines where to apply the soft focus effect.
If the image appears to be too soft or blurry, try using this switch. It will change the target of the soft focus to the shadows, which has the effect of subduing the blurring in the highlights.
|
 Brightness Slider
The Brightness Slider will add brightness to the highlights of your image. As the Softness Slider is increased, the brightness will increase, which can be a nice effect.
When the Softness Slider has a lower value, the Brightness Slider has less of an effect.
|
 Smart Contrast Slider
The Smart Contrast Slider adds contrast to the image while protecting the shadows and highlights. This can be used to add overall contrast to the image and is very useful in conjunction with the Highlights Slider and Brighten Shadows control.
|
 Add Color Slider
The Add Color Slider will add Sagelight Saturation to your image and can also remove color. Many images look better with a little color boost when the Soft Focus is applied.
Also, some images naturally gain color depending on the control settings. The Add Color slider can also remove color when set in a negative/left direction. The Soft Focus can sometimes add too much color, and the Add Color slider can be used to compensate.
|
 Brighten Shadows
 will brighten the shadow areas of your image. This is useful in all modes, but more useful in the Edgy algorithm since it tends to deepen shadows.
Use the Smart Contrast slider to compensate if the image appears too bright.
You can also add softness with the Softness Slider, which can be a nice effect when the image becomes brighter.
Use the Add Color control to compensate for saturation changes -- the Brighten Shadows function can sometimes add color to your image.
|
 Pro Options
When selected, more options appear which tend to be more advanced. When not selected/checked, more basic options appear.
|
 Load or Save Preset
Click this button to load or save a user-defined preset. This allows you to save all settings to a file and then retrieve them later for the same or other images.
|
|
|