|
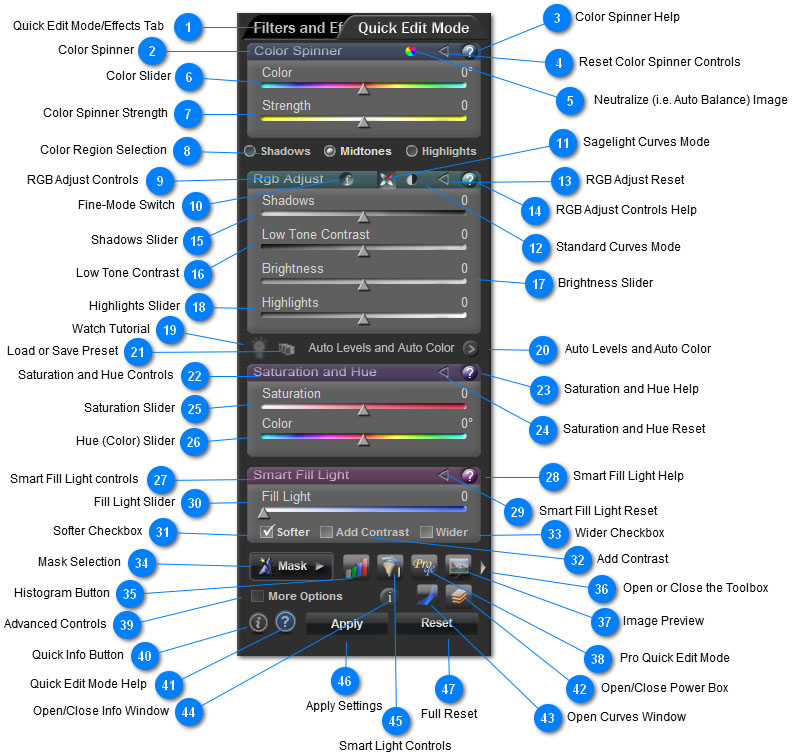
Basic Controls Quick Reference (Quick Edit Mode)
Hover the mouse over the circular tabs for a description of each function
 Quick Edit Mode/Effects Tab
This button is deprecated. Use the Image and Filters menu selections.
This moves between the Filters and Effects Mode and Quick Edit Mode. However, this button will disappear in an update in the near future. All of the functions in the Filters and Effects Tab or now located in the various Menu Bar items.
|
 Color Spinner
The controls in this section work with the Color Spinner, which is an advanced on the old-school Tint and Temperature controls. With the Color Spinner, you can set a color and a strength and get exactly what you want to change the tone of your image, where Tint and Temperature was guesswork.
See the description of the controls, and also this section: Color Spinner
|
 Color Spinner Help
Press this button for help on how to use the Color Spinner and related controls. In the "More Options" (advanced) mode, this also displays help on the controls that appear when "More Options" is checked.
|
 Reset Color Spinner Controls
Pressing this button will reset all of the Color Spinner controls, leaving all other controls untouched. Use the Reset button to reset every control to its initial state.
|
 Neutralize (i.e. Auto Balance) Image
This is a powerful feature in the Color Spinner. Pressing this button finds the best 'Neutral Color' for your image. Sometimes it makes the image look great right away, and other times it sets puts the image in a place to work with it and fine tune it. Here is how it works:
1. When you press this button, the Color Slider will move to the best netural color (if it doesn't move then it was already at the best color coincidentally). The Strength Slider will not be set.
2. Move the Strength Slider to the right. This will typically make your image warmer, and moving it in the opposite direction will make your image more cool. You can adjust it to get the factor you like.
3. Move the Color slider to the left and right to set the right tone. This button sets the image to a 'Neutral' state, which means that it puts you in the best position to work with it by just moving these controls.
4. Finally, try the Saturation or Vibrance Slider (in the Power Box). When an image becomes netural, it removes any hidden color casts (which is a good thing), but can make your image look like it has less color. When you add color, this can bring back the color in the image without increasing the color cast.
Using with the Auto Balance.
When you use the Auto Balance (in the Quick Edit Mode), this button is automatically pressed for you. This makes an even better combination. Try pressing the Auto Balance button, and then follow the steps above.
note: This button changes the midtone areas only (see the Color Region section below). When you press this button, the midtones will change, but the shadows and highlights will remain the same. This may give a falsely skewed result, as this function assume the shadows and highlights are set to 0. If there is any question, simply press the Color Spinner Reset or Full Reset (bottom of the screen, left) before pressing this button. When using the Auto Balance, this is not an issue -- it is reset for you.
|
 Color Slider
This changes the color in the Color Spinner. If you have the Strength set to the right, the image will move to that color based on the strength. A powerful feature of the Color Spinner is when you have the Strength moved to the left -- the Color slider will then move the image into an opposite color.
Why this is a great tool: If you see a cast in your image, say "green", you can set the Color Slider to a green hue, and then move the Strength Slider to the left. This will remove the cast without the guesswork of what color to move it to.
note: If the Strength Slider is set to 0, this has no effect.
|
 Color Spinner Strength
This sets the strength of the color hue as set in the above Color Slider. The more strength, the more the image will be tinted to that color. Moving the slider to the left will move the image in the opposite direction -- read the notes about this in the Color Slider section above.
|
 Color Region Selection
This sets the tonal region for the Color Spinner.
Important note: Each region exists independently. You can set the Shadows, Midtones, and Highlights in the Color Spinner independently.
Midtones is the default, but if you want to work with low-level colors, choose the Shadows. Highlight will work with brighter colors.
Typically, the Midtones is the best area to work with, but you can use the Shadows and Highlights to augment the results for more precise control.
note: pressing the Neutralize (auto balance) button only changes the midtones, and does not change the Shadows and Highlights (which may give the appearance of skewing the result).
|
 RGB Adjust Controls
The controls in this section are used to change the monochromatic tonal elements of your image, such as the brightness, contrast, and general tone, but without changing the color.
These use Sagelight Curves to protect your image and also make a powerful difference. You can also use traditional types of curves, as well.
See this section for more information: Sagelight Tone Curves, which details the technology behind Sagelight Curves, and also shows examples.
|
 Fine-Mode Switch
When checked (default), the RGB Adjust (and some other controls) are used in "Fine Mode", which means that the range is smaller then when unchecked.
This is typically the best mode, but you can uncheck this button to make the range wider. Fore example, the RGB controls will change much more drastically when this is unchecked, which can be useful.
The Saturation and Fill Light Slider also respond to the setting of this switch.
|
 Sagelight Curves Mode
When checked (default), this causes the RGB Adjust controls to use Sagelight Curves, which are softer curves that gives you a great flexibility and protect your image at the same time.
Sagelight Curves are designed to work together to create a wide range of tonal effects in your image. See the next section (Standard Curves Mode) for more information.
|
 Standard Curves Mode
When this is checked, the RGB Adjust Sliders use Standard Curves Mode.
note: The Traditional Mode controls are somewhat deprecated. Still useful, they are also replicated in the Power Box, which can be used simultaneously with the default Sagelight Curves Mode.
The "Low Tone Contrast" Slider will change to a "Contrast Slider" (see :"Low Tone Contrast" Slider section for more information).
The curves used here are multipliers rather than curves, and give you a harsher control over your image. Sometimes this is desired and can lead to sharper effects, such as brighter highlights and deeper shadows.
However, this mode does not protect your image like the Sagelight Curves. Watch the black points and white points for overruns (i.e. through the Histogram).
The Contrast Slider (which changes from the Low Tone Contrast) Slider offers traditional contrast control.
|
 RGB Adjust Reset
This resets all RGB Adjust controls, leaving all other controls alone. Use the Full Reset Button (bottom, left) to reset all controls in the Quick Edit Mode.
|
 RGB Adjust Controls Help
Pressing this button shows help on the RGB Adjust Controls. There are also advanced features described in this document (when the "More Options" checkbox is checked).
|
 Shadows Slider
This slider changes the shadow areas of your image. Lower values will deepen the shadows, and higher values will brighten the shadows.
In Sagelight Curves Mode (default), this curve can protect your image. Even when the image look dark and completely black, most information is still recoverable.
In Standard Curves Mode, when this slider blackens your image, the information can be lost; this drowns out the shadows in your image and has a much sharper, edgier effect. It can be a good choice, but make sure when you lose the shadows that you mean to do this. Watch the histogram.
|
 Low Tone Contrast
 is a powerful tool. This adds or removes contrast in your image in the low-to-midtone shadows, which is typically a good place to add contrast. Used in conjunction with the other controls in the RGB Adjust section, the Low Tone Contrast can help you get a great contrast in your image without making it look too edgy and without blowing out shadow are highlights.
Contrast Slider
In the Standard Curves Mode, this slider turns into the Contrast Slider, which will change the contrast in a traditional method. The traditional Contrast Method changes the contrast by simultaneously adding "exposure" (multiplying the RGB value) and bringing down the shadows (multiplying the RGB downward). This is a harsh method and can make your image look edgy and add a lot of contrast.
Sometimes this is desirable, but make sure to watch the Histogram for shadow underflows and highlight overflows -- sometimes this is desired in your image (i.e. in the latter stages of editing), but in the initial editing stages can cause a loss of details that cannot be recovered.
|
 Brightness Slider
This slider generally increases or decreases the brightness in your image. This performs a basic curve in the midtones. Use this slider in conjunction with the other sliders (particularly the Low Tone Contrast Slider) for a greater control of the tone of your image.
This slider is the same function in Sagelight Curves and Standard Curves Modes, and is the only slider that does not change when the mode changes.
|
 Highlights Slider
This increases or decreases the highlights in your image. In Sagelight Curves Mode (default), this will add or remove highlights without changing the White Point (point 1.0, or 255, or 65535, depending on how you look at the range of tonal values in your image). This performs a steep curve but can prevent highlight blowouts in your image. See this section Sagelight Tone Curves for more information on how this slider and other controls in the RGB Adjust (in Sagelight Curves Mode) protect your image.
In Standard Curves Mode, this simply acts as an "exposure" slider, which multiplies the tonal value of your image upward, causing highlights to pass the upper limit. Sometimes you want to do this, but the information -- once the top value is crossed -- is not recoverable without some Undo Brush or other action. Watch the Histogram for overflows.
|
 Watch Tutorial
Click this button to watch a tutorial on Youtube regarding the Quick Edit Mode. This will launch your browser and go to the YouTube page where the video tutorial exists.
|
 Auto Levels and Auto Color
Clicking this button will open a new window that will perform an Auto Levels and Auto Color on your image. See the help in this section for more information.
note: when done balancing your image, the "Neturalize Image" button is effectively pressed, but without setting the Strength Setting in the Color Spinner. See the notes in that section. Using the Color Spinner with this setting can help balance your image even further.
Also, consider using the Saturation Slider or Vibrance Slider (in the Power Box) after using the Auto Balance. The Auto Balance attempts to remove any color cast from your image, which can spread and become hard to deal with if not dealt with early in the process. Removing a color cast can cause a perceived loss of color. Use the Saturation and/or Vibrance Sliders to compensate.
|
 Load or Save Preset
Press this button to load or save a preset in the Quick Edit Mode. Loading a preset will load all controls for the Quick Edit Mode, Power Box, and Light Blender.
|
Saturation and Hue Controls
These controls allow you to adjust the saturation and hue shift of your image.
|
 Saturation and Hue Help
Press this button for more information on the Saturation and Hue controls
|
 Saturation and Hue Reset
This button resets the Saturation and Hue/Color Sliders, leaving all other controls untouched. Use the Full Reset button (bottom, left) to reset all Quick Edit Controls.
|
 Saturation Slider
This slider adds or removes color to your image.
note: It is better to use smaller amounts multiple times, rather than large amounts once. For example, if you use a setting of '20', press the Apply Button, and perform the same action, this has a higher quality than using a setting of '40' once.
Vibrance vs. Saturation
You can also use the Vibrance Slider in the Power Box instead of or in combination with the Saturation Slider. The Vibrance in the Power Box is a different form of saturation, and can work will with the Saturation Slider. Use the Saturation Slider for more natural color, and the Vibrance Slider for deep, vibrant colors. Mixing the two sliders works well because of the two different methods that are applied to your image.
|
 Hue (Color) Slider
This slider changes the HUE in your image. This will change the entire image (or the masked parts of it), rotating the colors in a HUE/COLOR circle from 0 to 360 degrees. This can be helpful when you mask part of the image. For example, if you click on the green areas and use this slider, only the green areas will change.
The Hue Slider is reversible. For example, if you set the angle at 180 degrees, press apply, and then perform the same action, the image will return to its original colors.
note: The Hue Slider is not perfect. If you move the colors, it doesn't guarantee you can get back to the exact color that was in place before the slider was moved. For greater control, use the Power Curves in HSL, or the Pro Quick Edit Mode in HSL mode.
|
 Smart Fill Light controls
These controls are a set of Smart Fill Light controls that will add light in the shadow areas of your image. It's 'Smart' because Sagelight has analyzed your image and determined where to add light before you come into the Quick Edit Mode.
Use these controls in conjunction with the Light Blender controls and other controls in the Power Box.
|
 Smart Fill Light Help
Press this button for more help with the Smart Fill Light controls
|
 Smart Fill Light Reset
Pressing this button will reset the Smart Fill Light Controls and no other controls in the Quick Edit Mode. Use the Full Reset Button (bottom, left) to reset all controls in the Quick Edit Mode.
|
 Fill Light Slider
This adds the fill light to your image. This will add light to the areas Sagelight has analyzed in your image, depending on the other settings in the Smart Fill Light controls.
Use this slider in conjunction with the Light Blender and other controls in the Power Box.
In the case of the Light Blender, which is essentially more powerful than the Fill Light Slider, this slider can provide a "lift" to the Light Blender controls. That is to say, even though the Light Blender controls are more powerful, they are also not quite as subtle as the Fill Light. Therefore, the Fill Light Slider can help set up the Light Blender functionality by initially lifting the light in the shadows in a very subtle manner upon which the Light Blender controls can expand upon.
In the case of the other Power Box controls, such as the Exposure, Smart Contrast, Blacks, and other controls, the Fill Light is designed to work with these controls, as well.
|
 Softer Checkbox
This adds a softer light to the Fill Light control, and is the default. When unchecked, the light added will have more contrast, which can look better on some cases.
|
 Add Contrast
When checked, this will add contrast to the fill light. This can be useful for some images where the Fill Light Slider is reducing contrast too much.
|
 Wider Checkbox
When checked, this adds range to the Fill Light, which will then add light in a wider scope, brightening more of your image.
|
 Mask Selection
note: clicking on the screen will also open the Color Picker controls.
This button will open a list of options for you to work with the masking in Sagelight. When pressed, the following options will appear:
-
Color Picker. This is also opened when you click on the screen, set to the color that is underneath the mouse pointer. This box will allow you to select a color range.
-
Select by Light and Color. This is a more advanced masking method, where you can select by Color, Light, or Light and Color. This allows you to narrow the range of your selection and also as more fluid than the Color Picker.
-
Advanced Masking. This opens the Advanced Masking box where you can have much more control over how your image is masked.
-
Draw Mask. This allows you to open up a mask that you can draw upon to isolate areas by hand.
How Masking Works
When the masking boxes are up and there is an active mask, only the masked areas will change when you use the Quick Edit Mode controls. For example, if you select red areas, only those areas will change. For example, of you use the Hue Slider, only the red hues will change.
You can use the mouse to constantly select new areas, editing the mask in realtime. This is a powerful element, as it allows you to refine your selection in realtime without editing the mask.
The Draw Mask also has a number of controls that you can change in realtime for effective mask control.
See the help section in the different mask areas for more help and information.
|
 Histogram Button
Pressing this button will turn the Histogram Window on and off. The histogram is a powerful tool allowing you to see what is happening in your image. This displays information in RGB mode. In the Pro Quick Edit and other modes, the Histogram will also display in different color spaces.
|
 Open or Close the Toolbox
This button will open or close the toolbox. If the toolbox disappears, press this button to locate it. Sometimes you may have to press it twice -- if the toolbox is open, but not located on the screen (or obscured), the initial press will close it, and the second press will open it again. Since the toolbox is small, sometimes you may want to continually press this button until you see the toolbox blinking on the screen.
In cases where the toolbox is not located within the screen, this button will cause the toolbox to be brought into the main screen area.
|
 Image Preview
This button will show you your image full-screen, bilinearly resized. If the image is smaller than the screensize, the image will appear full-size with a black screen behind it.
This allows you to see what your image will look like, smoothly resized at the size of your screen. It can give you a general view of how your image will look overall.
|
 Pro Quick Edit Mode
Press this Button to move into the Pro Quick Edit Mode, which has a more subtle set of controls, but are also a more 'professionally-oriented' set of controls that can allow you to edit your image in a different manner.
You can also press the 'A' key to switch back-and-forth between the Pro Quick Edit mode and Quick Edit Mode.
When you edit a RAW file, the Pro Quick Edit Mode is defaulted to as the initial editing mode.
|
 Advanced Controls
When this button is checked, more controls appear in the Quick Edit Mode, which allow for additional controls. See the specific help options for these controls.
|
 Quick Info Button
Press this button for Quick Information and Usage Tips on the Quick Edit Mode.
|
 Quick Edit Mode Help
Press this button for general help on the Quick Edit Mode.
|
 Open/Close Power Box
This button opens and closes the Power Box. The Power Box is a set of very powerful functions within the Quick Edit Mode.
note: When the Power Box is closed, any settings in the Power Box still remain active until the Reset Button is pressed.
See the help section in the Power Box for more information
|
 Open Curves Window
Adjust Curves. Press this button to open the Curves Box. This will allow you to adjust the curves in Sagelight, inside of the Quick Edit Mode.
notes:
-
The Curves in the Quick Edit Mode follow the "Keep Luminance Button". This is a powerful feature, as it allows you to adjust the Red, Green, and Blue curves without affecting the luminance. You can then use the RGB curve to effect the overall tone. When the Keep Luminance button is unchecked, then the curves act as traditional curves.
-
The curves also offer a number of functions to help balance your image. These can be very powerful, as you can then edit the curves after the function is completed.
-
For much more power, use the Power Curves instead. The curves are provided in the Quick Edit Mode for ease-of-use and for quick touch-ups. The Power Curves gives you a number of options not available in the Quick Edit Mode, including a Chroma curve that can be very useful.
|
 Open/Close Info Window
Press this button to open or close the Info Window. The Info Window displays the RGB, HSL, LAB,. and general hue of the point underneath the mouse. Move the mouse on the image to see these values change.
|
 Smart Light Controls
This button will open the Smart Light Controls. The Smart Light Controls are a very powerful set of functions, so much so that it has its own button.
Sagelight has advanced greatly in the last couple years, and the question has been raised: how is the Smart Light Function useful in comparison to the Light Blender, Power Box, and Smart Fill Light?
The answer is that the Smart Fill Light is set of overall, subtle controls. By using all controls in the Smart Fill Light, you can adjust the overall light of your image with a very high degree of control without getting lost. Some differences:
-
The Light Blender is an advanced tool, and it is easy to overdo it or get lost with these controls. By comparison, the Smart Light controls are more subtle and will help you along with the process.
-
The Smart Fill Light Slider is simply a subset of the Smart Light functions.
-
The Smart Light functionality is not in the Quick Edit Mode or Power Box because it is very complex, time-consuming, and memory hungry. In short, the Smart Light controls are a very powerful feature.
|
 Apply Settings
This will apply the current settings in the Quick Edit Mode, Power Box, and Light Blender to your image.
What this means
Basically, this is like saving your image. All settings in the Quick Edit Mode, Power Box, and Light Blender are "non-destructive", in the sense that they are a set of 20+ independent layers that can be adjusted simultaneously. For example, if you have a number of controls set in the Quick Edit Mode, and change the Saturation Setting, only the saturation changes, but the real-time result changes to show you how this has affected your image.
When the Apply Button is pressed, this flattens all of the layers and commits them to your image as if you saved your image to memory rather than disk. The controls in the Quick Edit Mode, Power Box, Light Blender, Curves (and any other Quick Edit Mode control) are reset to 0, which allows you to use the controls again.
Since most elements of Sagelight are processed in at least 32-bits per-channel, this allows all of the settings to be applied in the highest-possible quality.
In traditional editors, every little control movement is applied to your image directly, which can lead to loss of control and harm your image.
|
 Full Reset
This will reset all controls in the Quick Edit Mode, Power Box, Light Blender, and Curves Window. You can use the individual reset in each section to reset only those controls.
|
|
|