|
Hover the mouse over the circular tabs for a description of each function
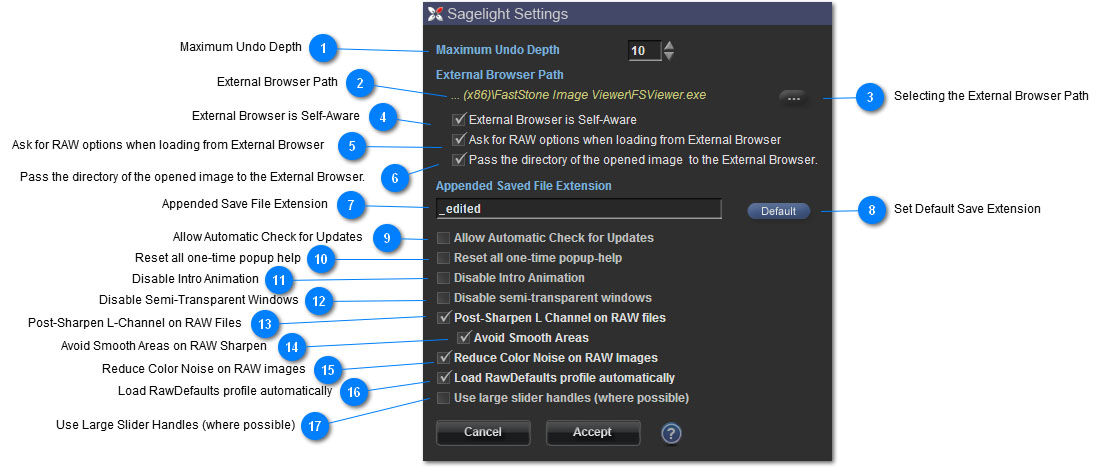
 Maximum Undo Depth
This will set the number of image states that will be kept in the Undo History Buffer. The default value is 10, and a maximum of 20 is recommended. When the amount of previous image states reaches the Undo Depth, the last image in the Undo History is removed.
You can access the Undo History image states by using the Undo and Redo Buttons or using the View Undo History menu selection. You can also use the Undo Brush to selectively apply elements of previous states to the current image.
|
 External Browser Path
You can set a path to an external browser to open from Sagelight to replace the normal Sagelight browsing. You can press 'E' or Control-E to open the browser. When you select an image from a browser, Sagelight will accept the image and load it immediately.
Use the Default Button to change the path.
Sagelight supports RAW browsing through the Windows Browser, which supports many different RAW types. Using an external browser may be a good alternative if you find that Windows does not suppor the RAW type for your camera.
Also, some people have browsers they prefer over the normal Windows browsing.
|
 Selecting the External Browser Path
Use this button to select the external image browser. Pressing this brings up a file browser so you can navigate to where you browser resides on disk.
|
 External Browser is Self-Aware
When Sagelight calls up an external browser (after 'E' or Control-E is pressed), if a self-aware browser is already running in memory, it will simply switch the window to its currently running instance.
A browser that is not self-aware will load another copy in memory, and there will then be multiple sessions of your browser in memory. There is nothing wrong with this, but it can be a little cumbersome of a new browser loads into memory every time you want to switch to it.
Setting this switch will tell Sagelight not to switch to the browser if it is already in memory. When this happens, Sagelight will display a message telling you the browser is already running.
If your browser is not self-aware, simply use ALT-TAB to switch to it when it is already running. When it is not in memory, Sagelight will load it for you.
|
 Ask for RAW options when loading from External Browser
Sagelight has two ways to load RAW images, one by using established defaults, and the other where you may select options prior to loading your RAW image.
When a RAW image is selected from a RAW browser, Sagelight defaults to loading the RAW with default options. When this option is checked, Sagelight will ask you to select RAW options before the image is loaded from an external browser.
|
 Pass the directory of the opened image to the External Browser.
By default, Sagelight sends the path of the currently opened file to the external browser. Most browsers understand that this is a message to start browsing in the directory in which the opened image is located.
If your external browser has a problem with this, or you want your external browser to default to its last known directory, turn this switch off.
|
 Appended Save File Extension
Sagelight makes every attempt to not write over your original file, as well as to preserve any in-progress versions that you may have edited over time.
By default, Sagelight append "_edited" to your filename when saving. For example, MyFile.jpg becomes MyFile_edited.jpg, and MyFile_edited.jpg becomes MyFile_edited2.jpg.
You may always override this be changing the name prior to saving/
Howeber, you may wish to have a different extension or to remove the extension altogether. To remove the extension, simply edit this field and leave it blank.
When you use any string for the Saved File Extension, Sagelight will automatically add the next number to it. For example, if you select the extension "_saved", sagelight will add "saved2", "saved3", etc. for each successive save.
|
 Set Default Save Extension
Use this button to set the default Save File Extension. This changes the extension back to "_edited".
|
 Allow Automatic Check for Updates
When checked, Sagelight will check for updates when you first load the program. If there is a new update, it will passively notify you in the screen before a file is opened by putting a message in the lower-left hand corner
Sagelight checks for updates every few days. Every once in a while, it can slow the startup process as it connects to the Sagelight server.
|
 Reset all one-time popup help
When you first start using Sagelight, popups come up automatically in some functions to give you an introduction to how Sagelight does things, or to give you some information Sagelight thinks you should know.
These popups typically have a "Don't show this message again" checkbox. Once checked, the popup never shows again.
Check this switch to reset all one-time popups to display again (just one-time).
|
 Disable Intro Animation
When checked, this disabled the introductory animation that occurs when Sagelight is first started, and a static screen is shown instead.
The animated intro (which cycles and blends small images) stops automatically after a couple minutes. Setting this switch disables it from starting.
|
 Disable Semi-Transparent Windows
By default, Sagelight uses semi-transparent window to make the display nicer and to give a larger view of your image. The histogram, info window, toolbox, and a number of popups, messages, and other windows are semi-transparent.
You may not like this style, and to shut off the semi-transparent windows, check this option.
note: Some windows may not become opaque until you restart Sagelight.
Special Note to Windows XP and Linux Users: Semi-transparent window may affect your display. If you see blank windows or windows that don't seem to update properly, try checking this box.
|
 Post-Sharpen L-Channel on RAW Files
When a RAW file is loaded, Sagelight can (and by default does) perform a light unsharp mask on the image in order to add a small amount of definition. This is standard procedure for RAW files, as RAW files tend to be very large and adding definition makes the image look better. This is standard for most editors that edit RAW images.
Sagelight uses a very light algorithm to avoid oversharpening or adding artifacts, and converts the image to C*I*E LAB mode to sharpen the L channel only so that the colors are not affected.
Uncheck this option to disable the automatic unsharp mask. You may notice your pictures seem to lack definition. You the Unsharp Mask or Definition controls in Sagelight to compensate.
|
 Avoid Smooth Areas on RAW Sharpen
When performing the automatic Unsharp Mask on the RAW file (when not disabled), Sagelight avoids smooth areas by default to only sharpen edges. Depending on your type of camera, you may wish to have Sagelight perform the Unsharp Mask across the entire image. The result will be a more defined image, but can lead to small amounts of image noise on some cameras.
|
 Reduce Color Noise on RAW images
Sagelight also reduces the color noise on RAW images. Most RAW images have color noise, and removing the color noise to some degree can help the overall process. Removing color noise first helps it not become magnified as you edit the image.
However, not all RAW image types work as well as others with this option. If your image seems reddish or seems to have sharp light dropoffs, try unchecking this option.
|
 Load RawDefaults profile automatically
Most RAW files benefit from light, automatic processing. Sagelight does this, as do many editors, in the form of a RawDefaults preset. This does not make any permanent changes to your image, but sets the controls in the Pro Quick Edit Mode for you, which you can then change.
Typically, these settings add color, contrast, and crispness to your image. Since it only sets controls, but does not apply them, it can also give you a good starting point for your image.
Uncheck this setting to prevent Sagelight from loading the RawDefaults preset.
Also, you can press "Reset" in the Pro Quick Edit Mode to remove the settings.
|
 Use Large Slider Handles (where possible)
In version 4.2, Sagelight changed the slider handles to a smaller, rectangular format. The previous handles were larger and may be easier to see.
If you liked the older slider handles, or have problems seeing the current slider handles, check this box to return to the larger slider handle style.
This will only apply to some menus, but not all submenus, as many submenus use the smaller slider handles by default.
|
|
|