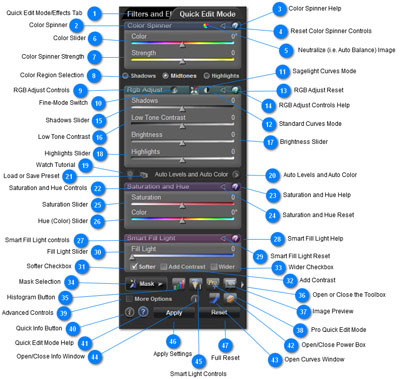
There are many functions in Sagelight to enhance your image. The main focus for general image enhancement for Sagelight is right here in the Quick Edit Mode.
The Quick Edit mode is a dynamic mode where many different functions can be set and changed in a real-time setting. In the Quick Edit Mode, you can change your image in many ways simultaneously:
Quick Edit Mode Tips
-
Auto Balance your image with the great auto-color technology designed just for Sagelight. This is a great way to start. To balance your image, click the button labeled "Auto Levels and Auto Color"
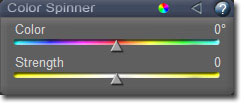
Use the Color Spinner Sliders to set the color tone and tint of your image, an advance over Tint & Temperature.
-
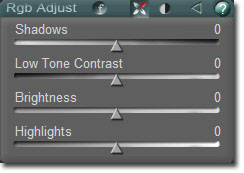
Set the Brightness, Shadows, Contrast, and general tone of your image with the RGB Adjust Controls .
-
Use the Power Box to add Vibrance and Definition, or to bring out the light and contrast in your image.
-
Fill in the Shadows with the Smart Fill Light tool.
-
Add (or remove) color to your image with the Saturation Slider.
-
Selectively change elements of your image with the Color Changer and other masking tools.
-
Use the Smart Light tool to bring out the mid-tone contrast based on an analysis of your image.
-
Draw Curves lets you use manual curves on all channels, to make powerful changes, or just touch it up.
-
Click "More options" for even more functions in the Quick Edit Mode.
Many other functions are available where you may set the tint, dodge and burn, adjust shadows and highlights, use the clone brush, Dodge and Burn, print, crop, sharpen, and more.
Quick Reference
Sagelight Technology
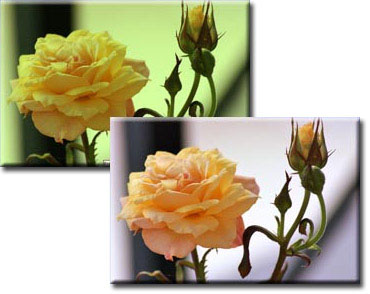
Before and After View of the Sagelight Vibrance Function
Sagelight embodies a large amount of new technology to make editing easier and to create professional results without less image-editing knowledge. In the Quick Edit Mode, this helps you create powerful effects in your image easily, while protecting your image from damage.
See the following for more information:
-
Color Spinner. This outlines the new technology in the Color Spinner and how it is better than Tint and Temperature.
-
Sagelight Vibrance. This document shows before and after images of Sagelight Vibrance technology, which is located in the Power Box (in the Quick Edit and Pro Quick Edit Modes)
-
Sagelight Saturation. This document shows the Sagelight-developed technology developed for adding color to your images.
-
Dynamic Masking. This document discusses the advanced and dynamic masking in Sagelight, which is easier and more powerful than traditional masking.
-
Color Balance Algorithms. This document discusses Sagelight's advanced auto-balance algorithms, and shows how they are much more accurate than traditional technology.
-
Multi-Layer Editing and Dynamic EditingThis document discusses the multiple layers Sagelight is able to use in the Quick Edit Mode and other Sagelight functions. 20-30 or more layers are used simultaneously to achieve high image quality, professional-level results, all without having to know the details of image editing.
-
Sagelight Tone Curves . This shows how the Sagelight Curves technology provides powerful functionality as well as protects your image. See the before and after examples.
Quick Edit Mode Overview
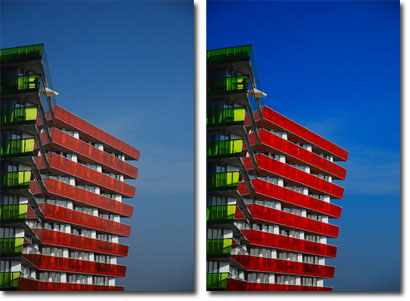
Before and After View of the Auto Balance Function
The Quick Edit Mode has a simple user interface to allow you to adjust as many related aspects of your picture at the same time. This also allows a great degree of control and flexibility in editing your image.
Each slider has been designed from principles in image-editing to work together to bring out different aspects of your image. Together, they form powerful controls to bring out amazing qualities in your image.
RGB Adjust Sliders. Use these sliders to adjust the shadows, mid-tones, and highlights. Low tones, Mid-tones, and Highlights can be selected and adjusted separately. Press the

button for more information.
The Color Spinner Sliders. These sliders can be used to adjust your image by color, to set balance your picture or to set a specific tint. As with the RGB Adjust Sliders, low tones, mid-tones, and highlights can be adjusted separately.
The RGB Curve Sliders. The Color Curve Sliders (not shown) are another mode that allow you to adjust the curves more precisely than the Color Toner. You can control Red, Green, and Blue channels independently. Not as easy as the Color Toner, but with more control. Press the More Options Button to activate this control.
Press the

Button for more information.
Smart Fill Light Slider. Use the Smart Fill Light Slider to fill your image based on an analysis of your image. Only the low tones are filled in, leaving the highlights alone. The Smart Fill Light slider works great in combination with the RGB Adjust Sliders.
Press the

Button near the Fill Light Slider for more information.
Auto Levels and Color Button. A good first step is to try the Auto Levels and Color Button. This will make most pictures look better. The Auto Color analyzes your image and attempts to remove color casts and bring back color.
Note: if the image seems less colorful but looks more neutral. This is normal -- use the Saturation Slider to increase the saturation.
Check the Show Video Tutorials menu item. There are tutorials on using this button, as well as the Quick Edit Mode.
Video Tutorials. There are many tutorials in Sagelight. In the menu system you can find the selection "Show Video Tutorials".
You will also see the above button in certain locations. Pressing this button will open your browser and take you to a video tutorial on the function where the button is located.
Apply Button. The Apply button allows you to apply all of the current control settings to your image. The controls are then reset, after which you can use them again on the same image.
The Apply can be a very powerful feature, turning Sagelight into a high-level discreet editor. You can make more minor and subtle changes, use the Apply Button, and then continue the process. This applies smaller, more discreet changes to your image, giving you more control and keep the quality very high.
Reset Button. Slider and other controls settings are not applied until you launch another Sagelight function (such as Smart Contrast, sharpening, etc.). Until then, you can press the Reset Button to clear all changes and start over.
Undo and Redo Buttons. Once you have applied your image or used any function outside of the Quick Edit Mode, you can use the Undo Button to go back (i.e. undo) the previous state or go back multiple states. You can use the Redo Button to go forward in the history to return to (or redo) states. With Sagelight Plus, you can also use the View Undo History menu selection to view and select all states in a single list.
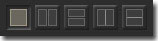
There are different ways to look at the display. You can use the Image Viewer to zoom an and out, and to move around in your image; use the before/after views to see side-by-side views, or use the Image View Buttons to overlay the original, last change, and current image on the same image. Each method gives a different way to view your image and to make sure you're getting the image you want.
Image View Buttons. As you change the image, you can overlay the last changed image or original image (as long as the size of the image has not changed via Resize or Crop). For instance, when you move a Slider or cause the image to change in the Quick Edit Mode, you can press "Unchanged/Applied" image to see the image as it exists before you press the Apply Button. Once you press the Apply Button or execute another Sagelight function (i.e. Smart Contrast, sharpening, etc.), you can use the same button to see the before/after view of the applied vs. current image.
You can also use the "Original Image" in the same way to see the original image.
These buttons are very useful in quickly viewing different states of your image, and can point out areas of the image that have changed too much.
note: you can click "Original Image" and "Unchanged/Applied" multiple times to toggle between the Current Image and the Original/Unchanged image.
These buttons work outside of the Quick Edit Mode in most other functions.
Before & After Image Views. Use these buttons to see before and after windows, side-by-side. Where the Image View Buttons described above temporarily overlay images, the Before and After Windows will show a window of the current image and original image side by side, either vertically or horizontally. You may still use the Image View Buttons in the Current Image window.
The two buttons on the right show the Before and After image views in one window, but split down the middle (either horizontally or vertically), with the current image on one side and the original image on the other side. The image is split in half, rather than showing the same view.
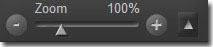
Zoom Control & Image Viewer. Use the Image Zoom Control to zoom in and out of your image. Once your image is zoomed in, the Image Viewer will appear where you may easily navigate to areas of your image by simply clicking on the thumbnail and moving the mouse around to locate and move to areas in your image.
There are many other functions in Sagelight, but there are three buttons that are specifically highlighted in the Quick Edit Mode sidebar.
Smart Light. You can get contrast and other great lighting from your image by using the Shadows and Highlights Sliders together in the RGB Adjust panel.
Traditional contrast can wash out high tones and make shadows too dark, and the RGB controls are not based on an analysis of your image.
The Smart Light function will bring out the mid-tone contrast, shadows, and highlights in your image by first analyzing your image and then applying the light to the most important areas.
Color Changer. With the Color Changer, you can select an area by color (by clicking on the screen or using a slider) and then change the Hue, Saturation, and Brightness of this area only. This can be great for quickly changing the color of an object, or reducing and increasing saturation, and adding great effects to your image. The Color Changer is a form of the masking, but keeps things easier.
note: This button has been moved to the toolbox. Click this button in the Toolbox to activate the Color Changer.
Masking. With the masking controls, you can select specific areas of the image by color, light, or both in two different color models (YUV and HSL) with a very high-degree of control. Once selected, you can use and apply any control in the Quick Edit Mode and it will apply only to the selected area.
You can also Draw a Mask around a subject to bring down the background and bring out the subject. Masking is a very powerful feature that allows you to make an incredible difference in your images with little effort. The results can be dramatic, and masking is a great way to add special effects to your images by focusing just on certain areas and colors.
For more professional results, use the Pro Quick Edit Box. The Quick Edit Box allows a wide range of changes in real-time, 16-bit-per-channel action. Though it has fewer options, the Pro Quick Edit Mode is designed for typical high-end professional needs to balance and adjust images.
Also try the Power Box, Pro Saturation and Pro Color Balance Features.