The Curves in the Quick Edit and Pro Quick Edit Modes provide a powerful set of curves functionality. While the Power Curves provide a wider array and more powerful set of standalone curves functions, the curves in the Quick Edit Mode and Pro Quick Edit mode have many embedded functions that are designed to work directly with the other controls of the Quick Edit Mode.
There are also a number of functions within the Curves in the Quick Edit/Pro Quick Edit modes designed specifically for these modes that are not in the Power Curves.
Technology
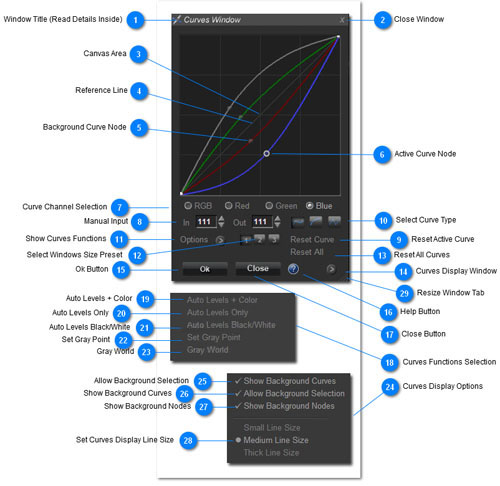
The Curves in the Quick Edit/Pro Quick Edit modes have the same basic interface as the curves eslewhere in Sagelight (see the Quick Reference section below), which contains an advanced, easy-to-use architecture that allows for much easier curves than tradtional methods, while also providing a large amount of power.
The traditional problem with curves is that they can be difficult to use, which can interrupt the creative flow. Sagelight curves offer easy background curve selection, fine-tuning using the keyboard and mouse wheel, as well as the ability to easily switch to different color spaces.
In the Quick Edit and Pro Quick Edit modes, Luminance-keeping functions allow the color curves to be used as color toning curves, which is a powerful tool, as this allows you to adjust the results of the other controls used, rather than completely changing the light and tonal changes already made. You can also switch this off to use the curves as normal curves.
Remove Color Cast and Auto Balance Functions in the Curves Window
In some ways curves can be limiting. For example, the RGB Adjust tools in the Quick Edit Mode/Pro Quick Edit Mode offer essentially a minimum of 10 simultaneous curves windows open at the same time. The Curves Window, by comparison, provides one curve for each RGB channel + the RGB channels together.
However, curves give you much more direct control, allowing you to manipulate curves in a way not possible with the RGB adjust controls. You can use the Options Window to perform the same functions as the Remove Color Cast and Auto Balance functions. The results are then displayed as curve points which you can directly manipulate. This can provide more flexibility and power to adjust the results, where the Remove Color Cast and Auto Balance functions, while powerful, provide you with a more limited set of results.
See the notes in the Quick Reference for more information. Also see the Video Tutorial.
The above video tutorial discusses how to use the Curves in the Quick Edit and Pro Quick Edit Mode. There are various sections:
Basic Controls. This shows how to easily use the basic controls of the Curves Window, which are the same throughout sagelight. After that, things get different, as dicussed in the following sections.
Color Toning. This section shows how to use the Curves in the Quick Edit Mode for color toning your image, and how the Curves algorithms help integrate into the Quick Edit mode by keeping the luminance the same throughout the toning.
Correcting Color Casts. This section shows how to use the embedded curves functions to correct color casts in the same way you would with the "Remove Color Cast" function, but with more control since you can change the resulting curves yourself.
Auto Levels and Auto Color. This shows how to perform the same Auto Balance functions used in the Sagelight functions, but with more control over the result.
Pro Quick Edit Mode and C*I*E LAB and HSL Color Spaces Color. This shows how the Pro Quick Edit mode curves can be used in the C*I*E LAB and HSL modes. Similar to the Power Curves, but you can use the other controls in the Pro Quick Edit mode together with the curves in these color spaces.
The contents of Curves in the Quick Edit and Pro Quick Edit Modes