|
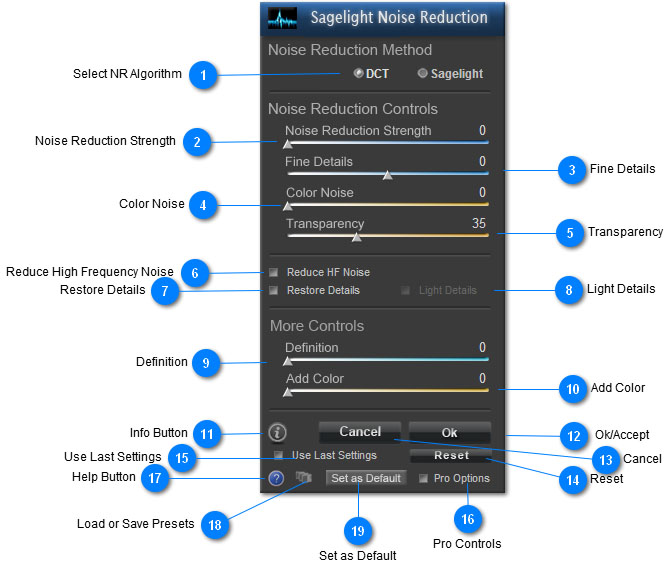
 Select NR Algorithm
DCT selects a DCT-based algoroithm, where you can use DCT 8x8 or DCT 16x16 (or an automatic setting).
DCT image-noise reduction (especially DCT 16x16) can deliver the most natural results and is easier to use, but it softer than Sagelight NR and not as flexible. For larger images, be sure to use DCT 16x16.
Sagelight Noise Reduction has more controls and can deliver edgier, sharper results. It's slightly harder to use, and isn't always as natural as DCT noise reduction, but the level of smoothing, sharpness, and crisp results often make it a better choice.
You can switch between DCT and Sagelight to compare settings. In almost all cases, the settings can be set for each type (DCT or Sagelight) to return almost exact the same result. When close, DCT will usually be slightly more natural, and Sagelight slightly more well-defined.
|
 Noise Reduction Strength
Use this slider to set the Noise Level in your image. The higher the value, the more the image is noise-reduced. Use the Fine Details Slider and other controls to control the finer elements.
Also use the transparency and Edge/Details controls.
|
 Fine Details
This slider adjusts the smaller, fine details of the image. After moving the Noise Reduction strength slider, use this slider (in either direction) to reduce or increase the noise reduction on smaller details. In many cases, you can reduce the Noise Reduction Strength and increase the Fine Details Slider to preserve details.
note: With high values, the Fine Details slider can start making the image too edgy. Use the Noise Reduction Strength slider to control the overall noise level and the Fine Details slider to augment the result.
|
 Color Noise
Remove color noise from the image. High values can reduce color. Use the Color Noise algorithms selection (in the Pro Controls). Also use the 'Restore Details' checkbox or use the Edge Controls (also in the Pro Controls) to help preserve strong colors.
|
 Transparency
 merges the original image with the noise reduction result. In many cases, the noise reduction makes the image look too clean. We're used to images with CCD noise of film grain to make it look natural, where an image without a little noise can look strange or artificial. Notice that the default transparency value is 35 (this corresponds to about 20% of the original image).
Use the transparency slider to merge back part of the original image (this only merges the details, not the colors) to make it look more natural. In most cases, the noise in the image has a pattern to it that is somewhat natural to the image; bringing a small amount of it back usually makes the image look better.
Adding Noise
In other cases, adding noise to the result is desirable. Use the Add Noise function in the Sagelight Menu system (under Noise Reduction). This can also make an image look more natural after it has been through the noise reduction process.
|
 Reduce High Frequency Noise
When checked, this reduces high-frequency noise in the image (when DCT NR is used). Digital image often has a high-frequency noise that is hard for noise reduction algorithms to detect, which often appear as cross-hatching or interference patterns. This switch will help remove this noise.
Pull back on the Fine Details Slider when using this switch, as it also reduces noise in the fine details.
|
 Restore Details
When checked, this will return some details to the image. This will usually make the image look more natural.
When not to use Restore Details
With almost all images, the Restore Details option will help with the image. In very noisy images, however, the returned details will look strange when next to the very smooth details. When this happens, use "Light Details" button or use the Edge Controls Window for more options.
Using the Edge Controls Window
The Restore Details option is just a setting of the overall Edge Controls. Use the Edge Controls to completely control how edges are handled in your image. This can often result in amazing results, both when removing large amounts of noise, or when removing very small details only.
Don't forget Restore Details is selected
When this switch is on, and then forgotten, it can appear that the other controls are not doing much, or sometimes nothing. The restore details switch will continuously return details, causing the other controls to work with smaller portions of the image (i.e. the bakground elements). Leaving this switch on and then forgetting about it can cause some confusion when using the other controls.
|
 Light Details
This restores a lighter set of details when the Restore Details option is on. This restore more details, but with less strength, to add back elements to the image similar to natural white noise, but with emphasis on the edges and details.
As with the Restore Details button, use the Edge Controls Window for many more powerful options, and don't forget the switch is active.
|
 Definition
Adds definition to the result image. Sometimes images can look a little smother after the noise reduction. The definition slider will add back definition to the image.
note: the definition added is only to the noise-reduced results. Using the Restore Details, Edge Window Controls, or Transparency Slider will reduce the effect. This is because the definition only intends to work with the noise-reduction part of the image. Use the Definition Controls in the Power Box (in the Quick Edit Mode) for more definition and sharpening after using the noise-reduction controls.
|
 Add Color
Color can be removed from the image when using the Color Noise Controls. Use this slider to add color back to the image, or just as a general 'Add Color' tool to increase the color saturation in the image. The Saturation algorithm used is Sagelight's algorithm with color protection active, which will increase colors warmly without overflowing bright colors.
|
 Info Button
Press this button for some quick information on the Sagelight Noise Reduction function.
|
 Ok/Accept
Press this button to apply the current settings to your image. When finished, the Noise Reduction controls are closed and Sagelight returns to the Quick Edit Mode.
|
 Cancel
Press this button to cancel changes and return to the Quick Edit Mode. This will return to the Quick Edit Mode with your image unchanged.
|
 Reset
Pressing the Reset button resets the Noise Reduction controls to the default settings.
Initially, the "factory settings" do nothing and are set in the DCT mode. Much of the time, you may want to perform the same (or similar) settings on subsequent images. You can set the default settings, and pressing the Reset Button will return to these settings. When the defaults have not been set (or have been cleared), pressing the Reset Button returns the controls their original "factory" settings, which do nothing to the image.
|
 Use Last Settings
When checked, the last settings used (in the current Sagelight session only) are used as the default when entering the Sagelight Noise Reduction controls. After you press OK or Cancel, and then return to the Quick Edit Mode, returning to the Noise Reduction controls will return to the same settings as they were before leaving the noise reduction function.
This is useful when using different settings, returning to the Quick Edit Mode and performing other functions, and returning.
Pressing reset always returns to the default settings, which are the settings used when first using the Sagelight Noise Reduction controls for each Sagelight session, or when the Use Last Settings option is not active.
|
 Pro Controls
Press this button to show the Pro Controls. The Pro Controls offer many more professional-level controls and flexibility with the Sagelight Noise Reduction.
|
 Help Button
Press this button to show help on the Sagelight Noise Reduction Controls.
|
 Load or Save Presets
Press this button to load or save a preset.
|
 Set as Default
Press this button to save the current settings as the default settings. The default settings will be set every time you enter the Sagelight Noise Reduction controls. when the "Use Last Settings" option is on, the last settings are used during the same Sagelight session only.
Press and hold the Set as Default button to return the defaults to the "Factory Settings", which do nothing to the image and put Sagelight Noise Reduction in the DCT mode.
note: You can use the default settings to only set the mode. For example, if you prefer the Sagelight NR mode vs. the DCT NR mode, you can select this only and the default settings will simply set this mode when entering the Sagelight Noise Reduction controls.
|
|
|