Tips for Keeping the Bokeh/Lens Blur Function as Fast as Possible
The Bokeh & Lens Blur Functions in Sagelight are written to be as fast as possible. Written in SSE2, SSE4 code and utilizing multiple processors, Sagelight can offer a real-time (or close to it) display while you're creating the Bokeh or Lens Blur Effect.
You can move the radius map (i.e. reticle) in the screen while the display continuously updates and use most controls to change the results with a refresh rate that allows you to experiment and get a feel for your changes.
However, the Bokeh and Lens Blur uses very intensive algorithms, and depending on the Blur Amount, the speed & processor count of your computer, and your display size, the display can slow down. Also, there are different radius shape types (i.e. Circle, Square, Triangle, Filled Circle, etc.) that determine the speed of the display -- simple shapes are faster and more complex shapes are slower.
Keeping the Display Fast
There are many things you can do to keep a fast display and to get very fast, real-time results. Even if the display is generally fast enough on your system, following some of these tips can make it even faster and more useful.
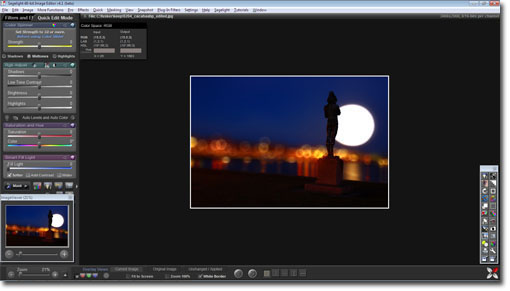
You can use the the ImageView Navigator control to shrink the window, or one of the preset before/after buttons to make the display smaller. The smaller the image is on your screen, the faster the results will be on the screen (this does not affect the time to generate the actual result).
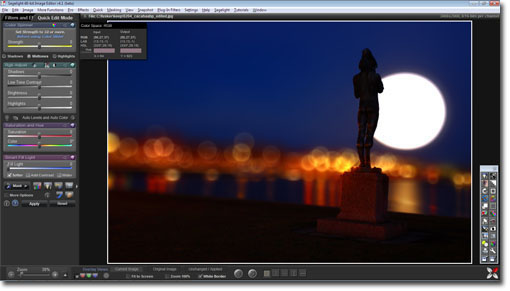
For example, if you're editing the image above, using the Bokeh/Lens Blur Controls can slow down depending on your computer's configuration, blur amount, kernel type, etc.
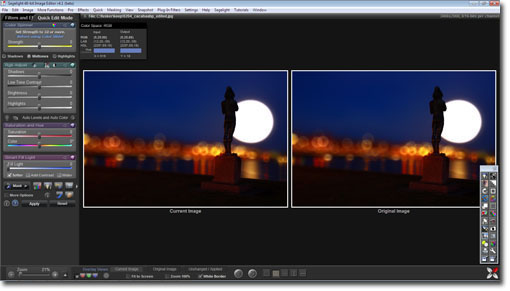
Before & After Preview Buttons
Using these buttons (the one depressed)
will set the before & after preview mode, showing you the image you're working with as well as the original image, such as:
This will shrink the working with considerable and increase the real-time display by a factor of about 4x.
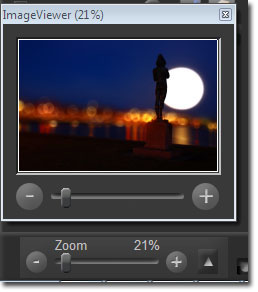
ImageView Navigator
You can also use these controls to shrink the window display:
which will make the window (for the shown image) appear smaller;
this will similarly increase the blur speed by a significant amount. This may be useful on computers with slower processors (i.e. Netbooks) or with large displays (i.e. 3200x2400).
tip: A smaller display will keep the real-time interaction much faster.
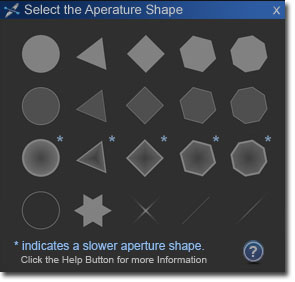
The more complex the blur shape, the longer it takes to render the image, whether it is a preview image or the result image. Here is a sample of blur shapes:
Taken directly from the Sagelight Bokeh/Lens Blur function (this may vary, depending on your version of Sagelight Bokeh), you can see that some shapes have a cyan '*' marking them as complex shapes. In actuality, any shape except the top row are considered slower shapes. These shapes cause the blur to take longer because they are more complex.
With simple filled shapes, Sagelight can take shortcuts to significantly decrease the render time, making the display faster.
tip: Use simple, solid/filled shapes while you're making initial adjustments. Switch to the more complex shapes before pressing the Apply Button or to preview the result.
In the lower part of the main menu is a checkbox called "Fast DOF". This switches the Bokeh/Lens Blur function to use a Depth of Field blur which is very fast. It does not have the Bokeh properties or shapes, and is the equivalent of using a Lens Blur with a square shape (i.e. a Box Blur) with no highlighting.
The DOF blur is extremely fast and offers a much more real-time experience. This can speed up the display while you're making adjustments for depth and general blur toning.
This is also very useful when you're editing the mask, as you can switch back and forth between the mask and the result much faster, typically, than with the shaped blurs.
tip: Use the "Fast DOF" (Depth of Field) blur when setting up the general depth of field/blur toning, and when editing the mask. This returns a much faster display.
Keeping the Result Image (i.e. after pressing the "Apply Button") Faster
When you press the Apply Button, the result image is generated. A lot of information necessary for the result image -- to maintain high quality -- is not needed in the preview. As such, the result image can be literally 10's of thousands of times more complex than the preview image. If you're using slower shapes (i.e. a circle with a gradient, for example), this can also increase the complexity on the output.
Sagelight Bokeh supports very high blur radii, which causes the blur to take longer in an exponential manner.
Today's images are easily 5000x4000, but this is not necessarily needed. In many cases, the result image is not nearly the size of the original. For example, if you're putting something out on the web (i.e. Flickr, etc.), the image is usually smaller.
tip: for large radius sizes, which can take a long time, think about the result image size. Typically working with an image about 2x the result size is a good size. You can reduce the amount of high-radius blurs by shrinking the size of the image first. Sagelight remembers the last settings -- therefore, if the blur is taking a long time, you can cancel, shrink the image, and return with the same settings very easily.